Ver.Kaのレビューしてみた!キットの特徴や気になる点についても!.jpg)
レビュー内では
「KPS/ABS」「合わせ目」「スミ入れ」
など、ガンプラ用語が出てきます。
意味がわからない場合は、先にガンプラ用語記事を読んでおくと理解しやすいです👇
MG 1/100 シナンジュ・スタイン(ナラティブ Ver.)Ver.Kaを購入しようか迷っているけど、キット内容はどうなのか気になりませんか?
果たしてMG 1/100 シナンジュ・スタイン(ナラティブ Ver.)Ver.Kaは、
- この値段に見合っているのか
- 初心者でも簡単に作ることが出来るのか
このようなことを購入前に知っておきたいですよね!
そこで、記事ではMG 1/100 シナンジュ・スタイン(ナラティブ Ver.)Ver.Kaを初心者の目線で分かりやすく徹底レビューをしていきます!
この記事を読むことでMG 1/100 シナンジュ・スタイン(ナラティブ Ver.)Ver.Kaの特徴や気になる点が分かります!
 とも
ともぜひMG 1/100 シナンジュ・スタイン(ナラティブ Ver.)Ver.Kaを購入する際の参考にしてみてください!
『機動戦士ガンダムNT』に出てくるゾルタン・アッカネンが搭乗するモビルスーツです。
MG 1/100 シナンジュ・スタイン(ナラティブ Ver.)Ver.Kaのキット内容
はじめにキット内容を紹介していきます。
| 発売日 | 2024年06月29日 |
| 価格 | 8,800円(税込) |
| 対象年齢 | 15才以上 |
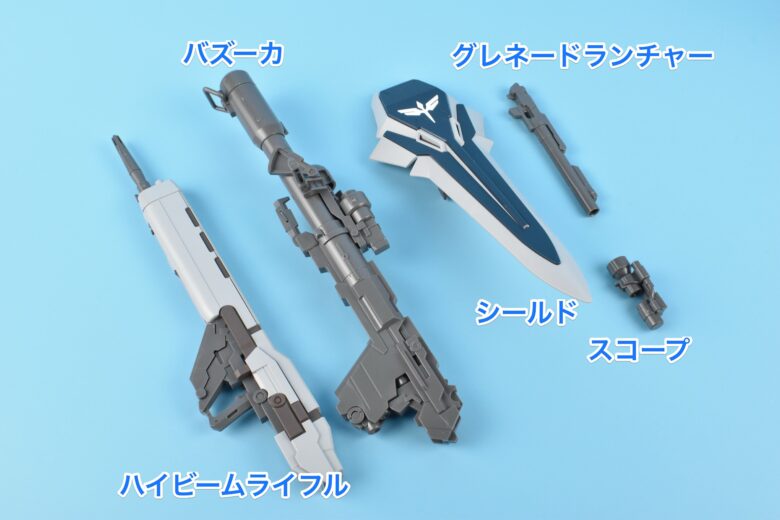
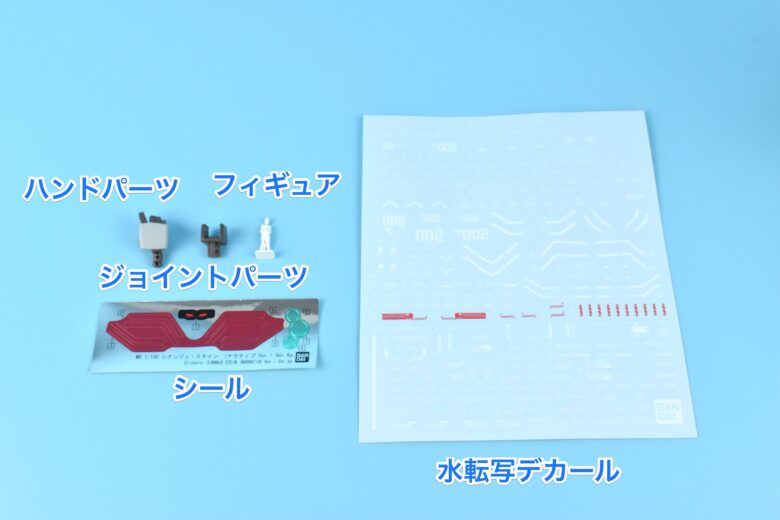
MG 1/100 シナンジュ・スタイン(ナラティブ Ver.)Ver.Kaの内容物
- シールド×1
- ハイ・ビーム・ライフル×1
- グレネード・ランチャー×1
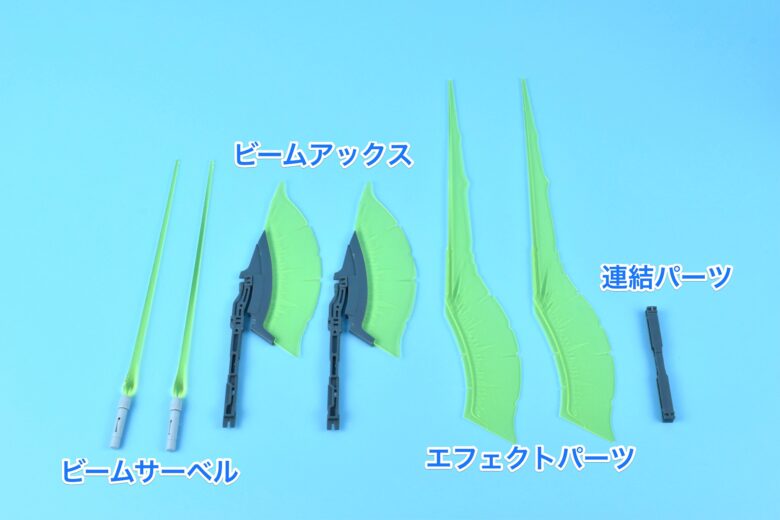
- ビーム・アックス×2
- バズーカ×1
- ビーム・サーベル×2
- エフェクトパーツ×1式
- ハンドパーツ×1式
- フィギュア×2種
- ジョイントパーツ×1式
- シール×1式
- 水転写デカール×1式
MG 1/100 シナンジュ・スタイン(ナラティブ Ver.)Ver.Kaのレビュー
続いて、組み立て後のレビューをしていきます。

MG 1/100 シナンジュ・スタイン(ナラティブ Ver.)Ver.Kaの評価
| 価格 | |
| 作りやすさ | |
| 可動域 | |
| スタイル | |
| ディテール |
※MG Ver.Ka(マスターグレード バージョンカトキ)を基準に評価しています。
※あくまでも一個人の評価です
※「良◎→○→△→×悪」の順で評価しています。
「MGシナンジュ・スタイン(ナラティブVer.)Ver.Ka」は、以前に発売された「MGシナンジュ・スタイン(ナラティブVer.)」をさらにバージョンアップしたキットです。

基本的な作りは、胸部や腕部のエングレービング(彫刻のようなディテール)が成型色で再現されているのが大きな特徴です。

シナンジュ・スタインは、角ばった装甲デザインが特徴的で、フェイスもガンダム風でツインアイになっています(モノアイではありません)。
シナンジュスタインはボリュームがあり、赤い方のMGシナンジュと同じくらいの大きさです。
関節部分は他のシナンジュ・スタインと同じく、ほとんどポリキャップを使わず、KPSの関節になっています。
手首はエモーションマニピュレーターという仕組みで、ここにはABS樹脂が使われています。

色分けについては、エングレービングが別パーツ化されているため、組み立てるだけでほぼ設定通りの配色が再現可能です。
ともただし、脚部のフレキシブルスラスター周りの赤い部分はホイルシールで色分けする必要があります!
特徴
ここではMG 1/100 シナンジュ・スタイン(ナラティブ Ver.)Ver.Kaの特徴を紹介します。
各部位の特徴や可動域
頭部
頭部は、鋭い目つきのツインアイが特徴的です。

装甲は角張っていますが、ヘルメット部分は丸みを帯びたデザインになっています。
胴体
胴体には一部新しいパーツが使われており、特に胸部のエングレービングが色分けされているのが特徴です。

コクピットは開閉でき、周りはクリアパーツで作られています。
 とも
ともコックピットには、座りフィギュアのゾルタンが登場しています!
背面のバックパック
背面のバックパックには、長いプロペラントタンクを持っています。
 とも
ともむき出しの6基のバーニアが高い推進力を感じさせ、迫力がありますね!
バーニアカバーは開閉可能で、左右のユニットはクランク状のジョイントで繋がっています。

また、基部がボールジョイントのため回転や若干の角度調整も可能です。

腕部
腕部の前腕にはエングレービングが色分けされており、完成度が高まっています。

また、前腕のカバーが展開してサーベルグリップを収納するギミックもあります。

腰アーマー
腰アーマーには全て裏打ちがあり、股関節のスイングギミックも以前のまま残っています。


脚部
脚部は、ほぼ共通ですが、フレキシブルスラスターの配色が一部異なります。

膝を曲げると装甲が連動して動き、つま先まで細かく動く構造です。

フレキシブルスラスターやふくらはぎのスラスターカバーも展開可能で、自由度が高い作りになっています。

足裏には肉抜きがなく、つま先も可動します。


可動範囲
肩周りは柔軟で、肘も深く曲がります。

腰のスイング幅は小さいですが、脚部は大きく開き、膝も深く曲がります。

長い脚のデザインですが、膝立ちも可能で、接地性も問題なしです。

盛りだくさんウェポン類
ビームライフル
まずビームライフルは、シナンジュと同じデザインの通常タイプです。

下部にはグレネードを装着できます。

また、エモーションマニピュレーター(手の部分)の他に、右手用の銃持ち手があるため、安定して保持できます。


スコープにはクリアパーツが使われていますが、一度はめ込むと取り外しが難しいので、塗装する場合は注意が必要です。

追加のジャケットパーツを取り付けることで、ハイ・ビームライフルになります。

銃口はシナンジュのライフルと同じ細いデザインです。

シールド
シールドにはエングレービングが再現されており、裏面にはビームアックスやグレネードを取り付けるジョイントが増設されています。


これにより、グレネードやビームアックス、連結用の柄パーツを収納可能です。
シールドはジョイントで取り付けられ、位置はある程度固定されます。

バズーカ
バズーカはシナンジュと同じタイプで、伸縮ギミックやセンサー周りの取り外しが可能です。


バズーカは腰にマウントすることが可能です。
また、ライフルに接続して大ボリュームの武器に変化させることもできます。

ビームサーベル
ビームサーベルはMGでよく使われるタイプの刃が2本付属しています。
 とも
ともシナンジュの大きな体には少し短く感じますね…!
ビームアックス
新たに付属するビームアックスは、グリップが新規ですが、ビームエフェクトはMGシナンジュのものを使っています。

シールドに装着したまま刃を展開することもできます。

エフェクトはシナンジュと共通で、ロングタイプのエフェクトパーツもあり、これを装着すると非常に長くなります。

アックスを連結形態用のグリップパーツに装着することで、2本のアックスを連結させることができます。

これにより、さまざまな形態やエフェクトが選べ、一気にアックスの選択肢が増します。
ともロングタイプの刃にすると、シナンジュ・スタインの大きさにも負けない迫力あるサイズになります!
気になる点
ここではMG 1/100 シナンジュ・スタイン(ナラティブ Ver.)Ver.Kaの気になる点を紹介していきます。
バックパックの武装が動く
MG 1/100 シナンジュ・スタイン(ナラティブ Ver.)Ver.Kaの気になる点の1つ目は、バックパックの武装が動くことです。
シナンジュスタインにあるプロペラントタンクや左右のスラスターのカバーなど、接続部分がボールジョイントになっています。

そのため、ポージングをつけたりする時に、少し触れただけで動いてしまうため、位置決めが難しいと感じました。
個人的にはプロペラントタンク以外の部分はボールジョイントではなく、通常のダボ穴で固定してくれた方がしっくりきたかもしれません。
ともしかし、人によってはプロペラントタンクやスラスターを自分好みの位置に持っていけるので、その点は良いかもしれませんね!
エモーションマニピュレーターの指が取れやすい
MG 1/100 シナンジュ・スタイン(ナラティブ Ver.)Ver.Kaの気になる点の1つ目は、エモーションマニピュレーターの指が外れやすいことです。
MGやRGによく付属しているエモーションマニピュレーターですが、指を関節ごとに曲げられるバンダイの優れた技術のハンドパーツです。
しかし、指を曲げたり、伸ばしたりすると指のつなぎ目部分が取れやすくなってしまいます。
何度も取り外しを繰り返すと、取り付け穴が大きくなり、指が上手く固定できず、すぐにポロリしてしまいます。

エモーションマニピュレーターの他にも握り手などのハンドパーツが付属していれば、問題ないのですが、銃の持ち手しかないため、今回のキットだけでは代用がききません。
ともエモーションマニピュレーターは、好き嫌いが分かれますが、個人的にはすごく嫌いなので、ハンドパーツはビルダーズパーツのMSハンドなどに変更したいと思います…!
MG 1/100 シナンジュ・スタイン(ナラティブ Ver.)Ver.Kaを組み立てた感想
今回はMG 1/100 シナンジュ・スタイン(ナラティブ Ver.)Ver.Kaのキット内容、組み立てたレビュー、特徴や気になる点を紹介していきました!
新しいパーツが追加され、エングレービング(彫刻のようなディテール)が色分けされるようになりました。
この変更により、全体の見た目が引き締まり、より魅力的になっています。
他の部分はほとんど同じですが、省かれていたビームアックスが追加され、ビームアックスは連結状態やエフェクトの大きさを選べるので、遊びの幅が広がりました。
MG 1/100 シナンジュ・スタイン(ナラティブ Ver.)Ver.Kaを見つけた際はぜひ購入して作ってみてはいかがでしょうか!

コメント